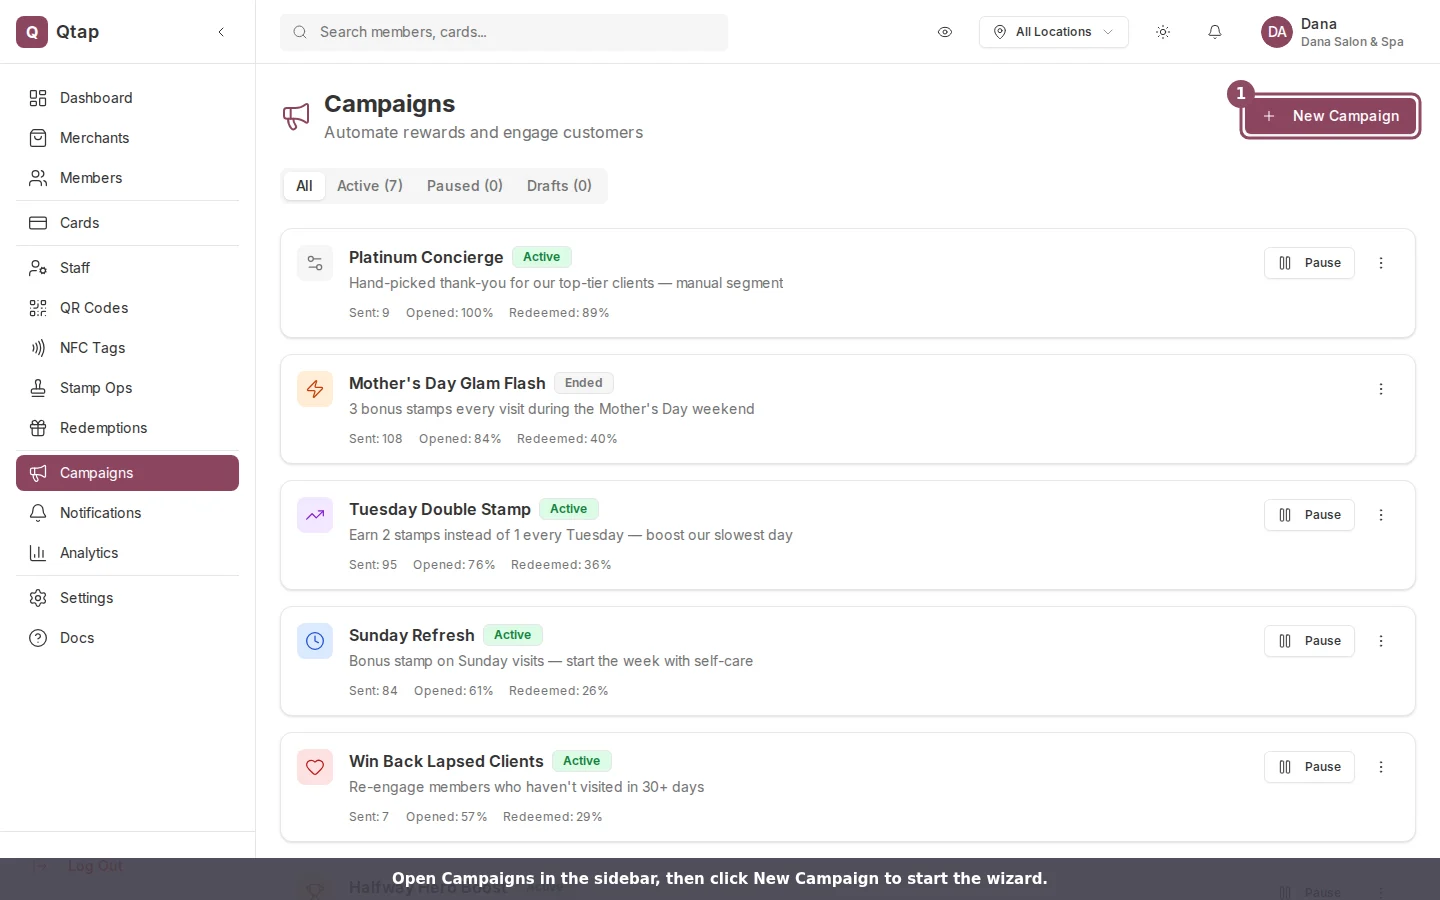
A campaign sends an automated push notification to your members when a condition you set is met, with an optional reward attached. You build one through a seven-step wizard. This page walks through every step. To start, open Campaigns in the left sidebar and click New Campaign.
Campaigns page with the New Campaign button highlighted
Owners and managers can create campaigns. Staff accounts can’t by default, so a staff member who opens this page sees an access message instead of the wizard.

The seven steps

The bar at the top of the wizard tracks your progress. Use Next and Back to move between steps. Steps 3, 5, and 6 are optional.
1
Step 1: Type
2
Pick one of the seven campaign types: Birthday Rewards, Win-Back, Milestone Celebration, Time-Based Promotion, Welcome, Points Multiplier, or Flash Sale. Each one comes with its own trigger and message. Then give the campaign a name. The name needs at least two characters before Next turns on. The description below it is optional and only you see it.
3
Campaign type selection with seven options and the name field
4
Step 2: Trigger
5
Set when the campaign fires. The options change with the type you picked. A birthday campaign asks how many days before the birthday to send (on the day, 1, 3, or 7 days). A win-back campaign asks for an inactivity window (14, 30, 60, or 90 days) and a cap on sends per member. A milestone campaign asks for a stamp total.
6
Trigger configuration for a birthday campaign
7
Step 3: Reward (optional)
8
Attach a reward to give members a reason to act. Choose from Free Item, Bonus Stamps, Bonus Points, Discount, or Special Badge, then fill in its detail. Skip this step to send a message on its own.
9
Reward type selection with five options
10
Step 4: Message
11
Write the push notification. The title takes up to 100 characters and the message up to 500. Both are required. Use Template fills a starting title and message for your campaign type that you can then edit. Tap a personalization chip (Customer Name, First Name, Stamps Count, or Reward Name) to drop it into the message; Qtap swaps each one for the member’s real value when the push goes out. The preview at the bottom shows how it reads.
12
Message step with title, body, personalization variables, and preview
13
Step 5: Conditions (optional)
14
Narrow who receives the campaign. Build rules from fields like Total Stamps, Days Since Last Visit, Total Redemptions, Tags, or Location, and choose whether a member must match ALL of or ANY of them. Leave this step empty to reach every eligible member.
15
Condition builder with field, operator, and value rules
16
Step 6: A/B Test (optional)
17
Turn on the switch to test two message versions against each other. Set the traffic split with the slider, write each variant, and add up to four in total. Leave the switch off to send one message to everyone.
18
Step 7: Review
19
Check the summary of your type, trigger, reward, and message. Then click Save as Draft to finish later, or Activate Campaign to start it now. A draft sits idle until you activate it from the Campaigns page.
20
Review step summary with Save as Draft and Activate Campaign buttons
Your plan sets how many campaigns can be active at once. When you reach that number, the New Campaign page shows a limit message with a link to upgrade instead of the wizard. Pause or end an active campaign to free up a slot.
Campaign notifications reach members through the Qtap member app. A member who hasn’t installed the app or turned on push won’t receive the message.

Campaigns Overview

How campaigns work and what each type does.

Win-Back Campaigns

A worked example of one campaign type, end to end.